
Prepare the ground before pouring concrete

It is very important that the ground where fresh concrete will be poured is in perfect condition, as this directly affects both the behavior and the durability of the future printed surface. For this, it is necessary to clean the surface from any elements that could be an obstacle, such as leaves or stones. Only in this way is a clean and high-quality surface guaranteed.
To ensure the evenness of the printed concrete floor, the levels and slopes of the terrain must be prepared. The base will be covered with a 400-scale polycrete film to prevent water loss from the concrete, and a perimeter joint will be placed and a mold box will be placed to limit the areas to be filled with concrete.
Before applying the concrete to the surface, it is very important to pour the material (15 cm) and sand (2 cm) and compact the supports.
Pouring concrete on the ground
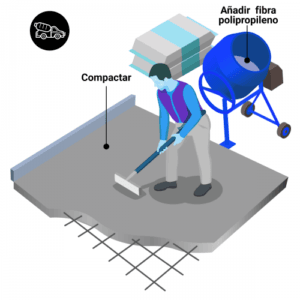
Once the support is prepared, it is time to pour the concrete evenly to prevent future problems. The concrete layer must be perfectly flat and compacted. Add polypropylene fibres to the concrete to increase its resistance. Also, a steel mesh and joints should be used at all perimeters and at the meetings with fixed elements.
The pouring of concrete onto the floor or pavement should be stopped if any of the following conditions occur:
If temperatures are expected to drop below 0ºC within the first 48 hours.
If the temperature of the concrete is below 10ºC or the ambient temperature exceeds 30ºC.
If there is excessive wind. This is a situation that could cause the surface to dry out.
Leveling and smoothing applied concrete on the ground
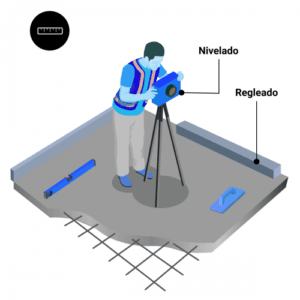
Use a roller to compact and flute the concrete. A trowel or leveler should be used to level or smooth the concrete floor. To make the stamped concrete correctly, there should be no mechanical vibration during the leveling process.
Plastering the concrete
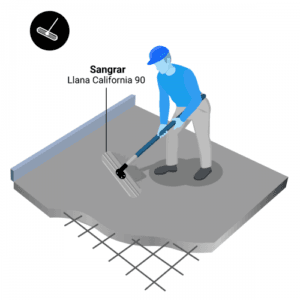
A plastering process is performed on the concrete that is still fresh to obtain a smooth, tight, durable, flat and long-lasting surface. Skipping this step can cause bubbles and lamination to form due to excess moisture.
Sprinkle the color hardener or printed mortar on the floor
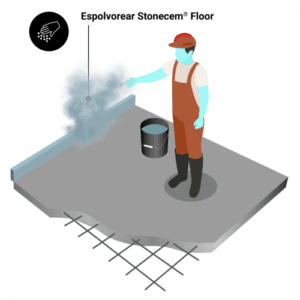
After the water loss of the concrete has evaporated, sprinkle the corresponding color hardener or printed mortar on the surface. In our case, from 4 Kg/m² for dark colors to 6 Kg/m² for light colors
To make imprinted concrete on the floors, it is very important to sprinkle the appropriate amount of product. Otherwise, the result of the imprinted concrete floor will not be as desired.
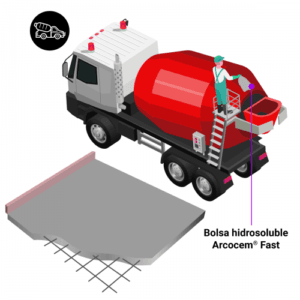
Mass concrete casting
Apart from the traditional floor painting technique of sprinkling, another system is to use a powder pigment.
The prepared concrete mixture is poured onto the surface to be applied and spread evenly. The thickness of the concrete should be determined according to the requirements of the project. Generally, a thickness of 10-15 cm will be sufficient. During the concrete casting, a trowel or leveling tools are used to make the surface smooth.
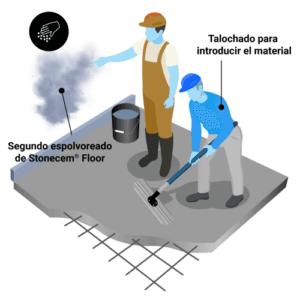
To talochar the color hardener or mortar imprint applied to the floor
Apply 2/3 of the specified amount of color hardener or imprinted mortar to the Stonecem® Floor and work the material into the concrete with a standard trowel. Then apply the remaining product and continue troweling until the desired result is achieved.
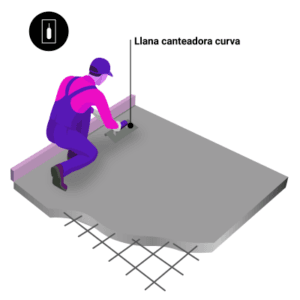
Leveling the future printed surface
The surface must remain completely flat and free of irregularities. To do this, use a steel trowel to ensure that the surface is pore-free and completely homogeneous. Level the edges with the concrete floor trowel, thus preventing spills.
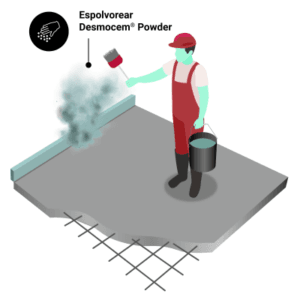
Apply the release agent for stamped concrete to the floor
Once the mortar has dried, make sure that the future printed surface has a hard but not rough appearance. And most importantly, that the surface is free of water. Once checked, apply the selected stamped concrete release agent.
Prime the concrete mold with the printed surface on the ground
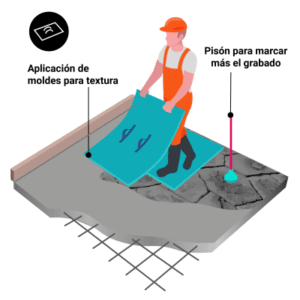
Before the pattern prints are made on the concrete, the molds are prepared. The printing molds are selected according to the desired pattern and placed carefully. The molds press the concrete, allowing the pattern to appear on the surface. During the printing process, the concrete must not have hardened completely yet. Otherwise, the pattern will not come out as desired.
To apply the floor concrete, it is essential to choose a mold and stamp it on the surface. Without this element, we would be talking about another decorative technique. En Imacem, We have more than 200 types to penetrate the ground in a certain way.
Once the stamped concrete mold is selected, stamp it to print it on the surface. The placement of the mold on the ground must be sequential and follow the continuity of the pieces. To obtain the same easier engraving, use a piston to help.
Once done, we will carefully remove the mold from the ground and place it on the untreated part of the stamped concrete floor. It is very important to respect the pattern created, so that the result will be optimal.
Remove the release agent for stamped concrete from the floor
If expansion joints were not initially planned, make the cuts according to the project and do so 24 hours before starting work. After at least 48 hours, remove the release agent for stamped concrete from the floor.
Clean the printed surface
After 72 hours, rinse the treated surface with water to remove product residues and let it dry. To clean the printed surface, a high-pressure washer with a pressure of approximately 90 bar can be used, apply the water gun at a distance of 50 centimeters and in the fan position.
Once the concrete has completely hardened and the protective coating has been applied, final checks are carried out. The patterns and the surface are checked to see if they are as desired. In addition, regular cleaning and maintenance of the stamped concrete surface ensures its longevity.
Apply varnish to protect the print.
The last step in making stamped concrete on surfaces is definitely one of the most important. Because only good protection can guarantee the durability and good condition of the floor. After the printing process is completed, suitable conditions must be provided for the curing (hardening) of the concrete. The curing period usually varies between 7-14 days. During this period, the concrete is kept moist to prevent cracking. In addition, a protective coating can be applied to protect the concrete. This coating preserves the color of the concrete and makes the surface resistant to water, oils and other external factors.